![]()
Diferencia entre revisiones de «Greater Patagonian Trail»
(→Entrance Permits and Fees) |
(→Entrance Permits and Entry Challenges) |
||
| Línea 335: | Línea 335: | ||
'''Fundo Las Truchas''': The fundo Las Truchas is owned by a regional big farmer. When he purchased this ranch he first kept it open for public access to the attractive Laguna Las Truchas. Unfortunately some locals don’t treat their environment with respect and litter or fish without limits. The owner got annoyed and now denies public access in particular to local citizen. When entering the fundo Las Truchas northbound you may be send back by the guard. If entering southbound you may be asked to leave the property in the direction you are hiking anyway. | '''Fundo Las Truchas''': The fundo Las Truchas is owned by a regional big farmer. When he purchased this ranch he first kept it open for public access to the attractive Laguna Las Truchas. Unfortunately some locals don’t treat their environment with respect and litter or fish without limits. The owner got annoyed and now denies public access in particular to local citizen. When entering the fundo Las Truchas northbound you may be send back by the guard. If entering southbound you may be asked to leave the property in the direction you are hiking anyway. | ||
| − | '''Section 3 Bad Weather Option''' | + | '''Section 3 "Bad Weather Option"''' |
'''Hydropower Station El Toro''': The Hydropower Station El Toro is owned by Endesa and controls the valley Rio Polcura upstream of Abanico. A permanently manned gate controls the northbound access from Abanico. There are no similar controls when entering the property southbound from the the Laguna de Las Lajas. An access permit may be requested in advance. | '''Hydropower Station El Toro''': The Hydropower Station El Toro is owned by Endesa and controls the valley Rio Polcura upstream of Abanico. A permanently manned gate controls the northbound access from Abanico. There are no similar controls when entering the property southbound from the the Laguna de Las Lajas. An access permit may be requested in advance. | ||
Revisión del 20:03 1 ago 2014

Summary

To be issued.
Creation of the Greater Patagonian Trail
To be issued.
Images
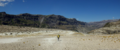
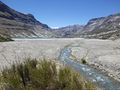
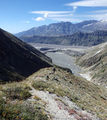
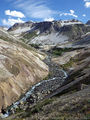
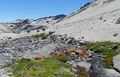
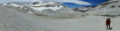
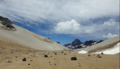
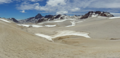
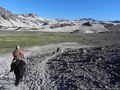
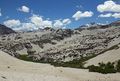
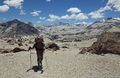
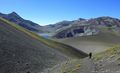
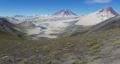
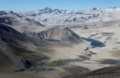
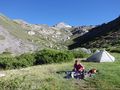
Here you find a selection of images from the Greater Patagonian Trail.
KMZ File for Trekking
The KMZ file displayed on the satellite map above is optimized to provide a good overview but does not include waypoints and detailed information for hiking. Therefore the KMZ file below should be downloaded and used if you actually plan to hike a section or the entire Greater Patagonian Trail.
Greater Patagonian Trail with waypoints, options and alternatives: KMZ file (Update from 2014-Jul-26)
Read the comment to the KMZ file after downloading to understand the structure and nomenclature of this file.
Trail Sections
The entire trail consists of 16 sections that require between 2 to 10 days each. Every section connects seamless with the following section and starts and ends near a road with public transportation. Therefore each section can be hiked as an individual trail or several sections can be combined to a longer trip.
The sections 2 and 3 can be combined with an alternative trial through a pristine area that bypasses the settlement and the road at the finish of section 2 and the start of section 3. This double section makes a true long distance endurance challange that gets you in 2 to 3 weeks through nearly untouched wilderness without passing a village or a public road.
| Section Name | Number | Distance | Ascent | Descent | Days | Time | Villages and towns on the trail or near the finish for resupply |
|---|---|---|---|---|---|---|---|
| Trail Start | - | - | - | - | - | - | Molina, Curicó |
| Volcán Descabezado | GPT01 | 103 km | 4970 m ↑ | 4870 m ↓ | 6 - 10 d | 34 h | San Clemente, Talca |
| Laguna Dial | GPT02 | 144 km | 5390 m ↑ | 5430 m ↓ | 7 - 10 d | 43 h | San Fabian, San Carlos, Chillán |
| Volcán Chillan | GPT03 | 129 km | 6420 m ↑ | 5820 m ↓ | 7 - 10 d | 42 h | Antuco, Los Angeles |
| Alternative Long Distance Challange via Las Truchas | GPT02-03 | 279 km | 12710 m ↑ | 12100 m ↓ | 14 - 21 d | 89 h | Antuco, Los Angeles |
| Volcán Antuco | GPT04 | 57 km | 1380 m ↑ | 1770 m ↓ | 3 - 5 d | 15 h | Ralco, Santa Bárbara, Los Angeles |
| Laguna El Barco | GPT05 | 43 km | 1490 m ↑ | 1500 m ↓ | 2 - 4 d | 13 h | Ralco, Santa Bárbara, Los Angeles |
| Guallali | GPT06 | 50 km | 2530 m ↑ | 2270 m ↓ | 3 - 4 d | 17 h | Lonquimay |
| Laguna Marinanqui | GPT07 | 82 km | 2870 m ↑ | 3030 m ↓ | 5 - 7 d | 24 h | Liucura on the trail, Lonquimay |
| Laguna Icalma and Volcán Sollipulli | GPT08 | 96 km | 2600 m ↑ | 2800 m ↓ | 5 - 7 d | 27 h | Icalma and Reigolil on the trail, Curarrehue, Pucon |
| Curarrehue | GPT09 | 70 km | 1860 m ↑ | 1680 m ↓ | 3 - 5 d | 19 h | Curarrehue on the trail, Pucon |
| Volcán Quetrupillan | GPT10 | 59 km | 2080 m ↑ | 2870 m ↓ | 3 - 5 d | 18 h | Coñaripe on the trail, Pucon |
| Neltume | GPT11 | 57 km | 950 m ↑ | 570 m ↓ | 3 - 4 d | 14 h | Neltume and Puerto Fuy on the trail |
| Lago Pirihueico | GPT12 | 86 km | 2210 m ↑ | 2720 m ↓ | 4 - 6 d | 24 h | Chabranco on the trail, Llifén, Futrono |
| Volcán Puyehue | GPT13 | 70 km | 2980 m ↑ | 2700 m ↓ | 4 - 6 d | 22 h | Entre Lagos, Osorno |
| Volcán Antillanca | GPT14 | 39 km | 1800 m ↑ | 2040 m ↓ | 3 - 4 d | 13 h | El Poncho, Puerto Rico, Osorno |
| Lago Todos Los Santos | GPT15 | 83 km | 2100 m ↑ | 2190 m ↓ | 4 - 6 d | 22 h | Ralún and Cochamó on the trail, Puerto Varas, Puerto Montt |
| Cochamó | GPT16 | 145 km | 4850 m ↑ | 4690 m ↓ | 7 - 10 d | 42 h | Llanada Grande on the trail, Lago Puelo, El Bolson |
| Complete Greater Patagonian Trail | GPT | 1311 km | 46480 m ↑ | 46950 m ↓ | 69 - 103 d | 389 h | - |
Read the comment to distances, ascents, descents and walking times to correctly understand the recording, calculation and relevance of these numerical values.
Trail Types
When planning the Greater Patagonian Trail the first choice were the hiking or horse trails that traverse the remote valleys and mountain passes in the heart of the Andes close to the border between Chile and Argentina. Most of these trails are created and maintained by local herdsmen to drive animals to their pastures.
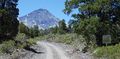
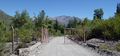
The second choice were unused or rarely travelled dirt roads. Such roads typically provide access to isolated settlements or villages without significant transit traffic. Some of these roads are not maintained anymore and not accessible by vehicle but passable for hikers.
In some areas the Greater Patagonian Trail crosses through open terrain without a visible trail. These cross-country routes do not pass very dense vegetation and can be hiked without cutting a trail with a machete through temperate rainforest. Some of these cross-country parts lead through steep and exposed terrain but do not require technical climbing.
Public roads with transit traffic were avoided wherever possible. Paved roads were the last choice of all.
In the Chilean River- and Lake-District the Greater Patagonian Trail incorporates one river and several lakes that can be floated down or crossed with a packraft. If not carrying such a light-weight inflatable boat all these water sections can be bypassed on food, by ferry or with private boat transfers.
| Trail Type | Distance | Percentage | Comment |
|---|---|---|---|
| Minor Dirt Road | 532 km | 40.6% | No or light traffic only. Can also be an abandoned road or a private road that is not open for public use. |
| Hiking or Horse Trail | 486 km | 37.1% | Mostly visible trail on any terrain. |
| Lake (Packraft) | 95 km | 7.3% | Alternative options available if not carrying a packraft. |
| Mayor Dirt Road | 83 km | 6.3% | Public dirt roads with moderate traffic. |
| Cross Country | 73 km | 5.6% | Track that pases through open landscape without a visisble trail. |
| To be verified | 15 km | 1.2% | Remains to be hiked and recorded by GPS to update the trail file. Alternative option available if not in explorers mood. |
| River (Packraft) | 15 km | 1.1% | Alternative options available if not carrying a packraft. |
| Paved Road | 11 km | 0.8% | Only few shorter segments at the start or finish of a sections. |
| Complete Trail | 1311 km | 100.0% | - |
Expected Duration
Hiking the complete trail requires approx. 90 to 120 days. This inculdes some rest days, resupply bus trips to nearby towns and an occasional day lost to bad weather.
Recommended Season
If you plan to hike the entire trail starting with section 1 you should leave within December.
On the first sections several rivers and high passes need to be crossed. In particular high river-water-levels during snowmelt may make the river crossings difficult and dangerous until early December. Therefore leaving before December may put you in risk when crossing rivers and passes. But if you leave after December you may be surprised by the heralds of the winter before reaching the finish.
If you do not insist in hiking all trail sections in the correct sequence then you have more options when and where to start. If you want to leave before December and you have a packraft you may in example set out in late October or November in Coñaripe. This is the start of section 11 and the first of the six packraft sections. Starting with this section before December give you the advantage of floating down the river Caucuá with a comfortable high river-water-level during snow melt. Once you reached the finish of section 16 your can travel by bus to the start of section 1 an hike all the way to the point where you started the track.
Trekking Direction
The generally recommended trekking direction is southbound even if most sections can be hiked in either direction.
Some sections require an entrance permit if you hike northbound. This limitation applies to section 1, 2-3 and 12. Without an entrance permit you may be “kicked out” but if you walk southbound this means leaving the property in the direction that you are hiking anyway.
Also for section 11 the southbound limitation applies but for a different reason. Only in this direction you can float down the river Caucuá with your packraft. If you want to hike section 11 northbound you need to take a rather boring dirt road with moderate traffic.
For section 15 the recommended trekking direction is also southbound. If you go south you can ask shortly before reaching the Lago Todos Los Santos a local settler for a private boat transfer. In the other direction this may not work as easy. So if you do not have a packraft or if you are unsure that you really want to cross such a rather large lake with a tiny boat than hike the section 15 southbound.
Entrance Permits and Fees
Nearly the entire trail can be hiked without entrance permits or paying entrance fees. And what is even better: many of the humble people that live along the trail will welcome you or even invite you to stay. Hospitality matters.
But there are a few exceptions; some already mentioned above under Trekking Direction. Unfortunately the public right of way is vague and sometimes ignored in Chile. By Chilean law the access to the coast, to lakes and to rivers is a public right but there are numerous cases where this gets disregarded. There are simply no penalties if someone unlawfully denies passage. I'm not sufficiently familiar with Chilean law to state if a similar public right of way applies to all the connecting trails and roads on private properties. But if it exists it’s occasionally disregarded. Some rich landlords with huge plots employ guards and instruct them to deny access to anyone.
Entrance Permits and Entry Challenges
Section 1
Hydropower Station Cipreses: The Hydropower Station Cipreses is owned by Endesa and controls the valley between the Route 115 and the Laguna de La Invernada. Permanently manned gates control the northbound access from the Route 115 but there are no similar barriers when entering the property southbound from the volcano Descabezado. An access permit can be requested in advance and is normally granted.
Section 2-3
Fundo Las Truchas: The fundo Las Truchas is owned by a regional big farmer. When he purchased this ranch he first kept it open for public access to the attractive Laguna Las Truchas. Unfortunately some locals don’t treat their environment with respect and litter or fish without limits. The owner got annoyed and now denies public access in particular to local citizen. When entering the fundo Las Truchas northbound you may be send back by the guard. If entering southbound you may be asked to leave the property in the direction you are hiking anyway.
Section 3 "Bad Weather Option"
Hydropower Station El Toro: The Hydropower Station El Toro is owned by Endesa and controls the valley Rio Polcura upstream of Abanico. A permanently manned gate controls the northbound access from Abanico. There are no similar controls when entering the property southbound from the the Laguna de Las Lajas. An access permit may be requested in advance.
Section 12
Parque Huilo Huilo: During the later days of the Pinochet Regime large parts of the state owned forest around the Lago Pirihueico were sold under obscure circumstances to the German immigrant Victor Petermann. He later converted the forest into a “private for profit natural reserve”. The emphasis seems to be on profit. Permanently manned gates now limit access to guests of the luxury resorts. Wood logging continues in more hidden parts of the “profit reserve”. When we attempted to take the former public road from Puerto Fuy to Pirihueico we were turned back on several of the gates. For this reason we took the ferry over the lago Piriheuco and walked the same road but from the other side where we did not encounter any manned gates.
Fundo Chihuio: The fundo Chihuio is situated north of the Termas de Chihuio and owned by rich businessman. The guard lives at the southern entrance to the Fundo. He is instructed to deny access to the former public road towards Puerto Fuy and Pirihueico. When hiking southbound you will leave the property at the entrance where the guard lives.
Section 13
Fundo Carrán: The Fundo Carrán is located south of the Lago Maihue. We crossed the Lago Maihue southbound and entered the fundo Carrán unknowingly from the shore of the Lago Maihue. We than walked about 5 km until we reached a locked gate just before a public road. We could easily climb over the locked gate to continue on the public road.
What we experienced on the trail seems a mirror of the Chilean society to me: The humble poor people on the trail opened the door to their houses to give us shelter and they literally shared their bread with use without even asking for it. But some of the super-rich denied access to their immense properties on which they don’t even live when kindly asking for permission to only pass.
Entrance Fees
Section 13
Southbound Access to Cordon Caulle: A very fiendly and helpful older couple lives at the northern access to the Cordon Caulle and volcano Puyehue. They own the forest with the road that provides access to volcanic area where 2011 a mayor erruption occured. They offer you shelter if the weather does not permit a crossing of the volcanic plateou. They charged a 6'000 CLP entrance fee.
Northbound Access to Cordon Caulle: The restaurant "El Caulle" is situated at the southern access to the Puyehue and Cordon Caulle. They also maintain the refuge higher up on the food of the volcano Puyehue. They charged a 10'000 CLP entrance fee.
Logistical Considerations
Importation of Food
Chile is very cautious when it comes to importing food, plants and animals. To minimize the risk of introducing pests,invasive plants and animals such imports are highly regulated and controlled. Therefore individuals are strictly banned to bring fresh fruits, vegetables, raw milk or meat products to Chile. Only processed sterile food can be imported in concealed packing’s, in example all heat treated canned items in closed containers. Thorough checks are performed by the SAG (Servicio Agrícola y Ganadero) on the airport and the border checkpoints from neighbouring countries.
- Example of strictly banned items:
- Fresh and dried fruits
- Fresh cheese
- Raw meat and meat products like ham and sausages
- Honey
- Example of normally accepted items:
- Bread, cookies and other baked items
- All canned items even if containing milk and meat products
- Sweats like chocolate, candies and cereal bar
- Cereals, corn flakes and chocolate powder
- Pasta, rice, flour and dehydrated potato puree
- Instant meals like dehydrated trekking food in concealed bags
When crossing the border to Chile you need to fill in a declaration if you are carrying any plant or food products. On this declaration the definition for plant or food products is very wide and includes all the permitted items as well. Therefore the best and only correct thing is to always state YES. If ask explain that you are aware of the restrictions and that you carry processed food and give examples.
If you state NO but something banned is found you will be charged a high fine.
You should also clean your boots from visible mud since mud may contain seamen of invasive plants.
Theoretically the same rules apply when crossing into Argentina but controls are often much more relaxed and you do not need fill and sign a declaration.
Resupply at Nearby Towns
There are no proper shops along the first seven sections of the trail. The first regular food store on the trail comes after 600 km at the finish of section 7. But there is a road with public transportation at the end of each section that gives you the opportunity to take a bus and to travel to the next village or town to resupply. See the table under trail sections with suitable resupply villages and towns.
The product range in smaller villages and towns is limited. In particular dehydrated trekking food may not be offered at all. If you prefer to have some special stuff that you find only in Santiago or that you bring with you from overseas you have the following option: You pack a box with food and other gear in Santiago and send the box with one of the mayor bus companies to a town where you plan a resupply stop. To send the box you do not need any address in this town; all you need to do is making yourself the recipient of your own package. The bus company will ship your box to this town in 1 or 2 days and store it until you pick it up. There you can take out of your box whatever you need and resend the box with the reamining stuff to the next resupply town where it will be stored again. Storage of up to 30 days is free of charge.
Suitable resupply towns with bus cargo stations are:
- Talca (Turbus)
- San Carlos (Turbus)
- Chillán (Turbus, JAC)
- Los Angeles (Turbus, JAC)
- Lonquimay (JAC)
- Pucon (Turbus, JAC)
- Osorno (Turbus, JAC)
- Puerto Montt (Turbus, JAC)
- Puerto Varas (Turbus, JAC)
A true through-hike would require the setup of food depots on strategic points along the route.
Food Supply on the Trail
On this trail, in particular on the first seven sections you will meet herdsman on the summer pastures with their annimals mainly cattle, sheep, goats and horses. Depending on the altitude and the snowmelt they migrate up between October and January and return home in April or May. These herdsman, locally called "Puestero", live in imporvised permanent shelters, called "Puesto". They bring large quantities of food with their horses and mules up in the mountains. You may ask them for food, in particular for flour and bread or whatever they are willing to sell. If you are desperate for meet they may sell you a goat or a sheep but be aware, the smallest quantity for sale is typically half an annimal. To communicate with the locals you need to speak Spanish.
On section 5 to 10 you will cross the Araucania region with plenty of impressive Araucaria trees, that are ancient evergreen coniferous trees. What we liked on these living fossiles were not just the imposing figure, but the nutritious female sead cones that are rich in carbohydrates. These fruites or "piñiones" were the main staple food for the indigious Pehuenche people and they teached us how to harvest and prepare them. You can gather these Araucaria "piñioes" between February and April.
Tourist Visa
As a non-Chilean tourist with a regular tourist visa you can stay up to 90 days in Chile. With an estimated duration of 90 to 120 days it is possible to complete the entire trail in 90 days but leaves little margin for rest breaks or weather related delays.
The easiest way to renew your visa is travelling to Argentina before completing your 90 days and return a few days later to Chile. On re-entry you will normally be granted another 90 days. Such a visa trip can be combined with a resupply stop in a nearby town. Recommendable visa trips are:
- Section 9: From Curarrehue in Chile to Junin de Los Andes or San Martin de Los Andes in Argentina
- Section 13: From Osorno in Chile to San Carlos de Bariloche in Argentina
If doing the packraft sections 11 to 16 first you will cross the border from Chile to Argentina on food at the end of the last section and renew your turist visa when returning to Chile. This will give you enough time to hike sections 1 to 10 in a comfortable pace.
If you insist in not taking any bus or motorized vehicle during the entire trek you have three options:
- You hurry up to reach the finish of the Greater Patagonian Trail in Argentina within 90 days counted from your arrival in Chile.
- You can walk on food from Icalma in Chile to Villa Pehuenia and back (Section 8, 16 km one way).
- You request an turist visa extension in Chile.
Recommended Equipment
Packraft
A packraft is a light-weight inflatable boat designed to be carried in the backpack when not needed but to carry the backpacker and his backpack over lakes and rivers when he needs it. A packraft is recommended for sections 11, 12, 13, 15 and 16.
Here you find some images of our packraft.
The packraft made our trip much more diverse. It was so great to walk to the shore of a lake or river, take the backpack down, inflate the boat, store the gear, take a seat and row off.
At the two larger lakes you can alternatively take a daily ferry (Lago Pirihueco) or a private boat transfer (Lago Todos Los Santos). For all other lakes and rivers alternative trails, that circumvent the water are included in the GPS File for Trekking below. So you can bypass on food all water sections if you do not have a packraft or if wind and weather does not permit the crossing of a lake with a rather tiny boat.
GPS and Electronic Map
The trail is mostly unmarked, partly not visible and only smaller fractions are documented with maps. Therefore a GPS is essential for navigation. In addition an electronic topographical map is recommended.
We used a Garmin GPS with the Garmin TOPO Chile Deluxe electronic map. The topographical profile, rivers, lakes, road and towns are precisely mapped. Only smaller streams, smaller lagoons and some trails are partly incorrecly placed on the electronic map. Garmin now offers a electronic topographical map that covers all Chile, Argentina and Bolivia and with this all Patagonia. The price is just slightly higher price than Chile only. This map is probably the currently best choise for this trail and furture trail extensions to the south that will incorporate larger sections on Argentine soil.
SPOT Satellite Trekker
The Greater Patagonian Trail leads partly through rather isolated uninhabited areas with no mobile phone coverage at all. In case of an accident a satellite based emergency communication devise may contribute to your survival. SPOT offers a light weight emergency beacon that when pushing an emergency button submits a distress signal via satellite with your GPS position to a rescue centre.
This devise can also be set up to regularly send the GPS position and display the track on the internet. We carried such a personal satellite tracker and our families and friends stayed much more relaxed because they could see us move day by day through the mountains. You find further information to this devise on the manufacturers homepage.
Solar Charger
The partly long stages and the limited supply along the trail requires a proper power management for the GPS, the camera and all other electronic gear. If you rely on the GPS for navigation you need to make sure to have in functional whenever needed.
We opted to carry a solar power panel to recharge all our batteries while hiking. Carrying regular batteries for up to 3 weeks would have meant a substantial extra weight.
Required Skills and Capabilities
The Greater Patagonian Trail requires endurance not only because of the total trail lenght but the rather long trail sections. The first three sections exceed 100 km each without regular resupply points on the route. If combining sections the distances become even larger.
Hiking this trail requires a datailed planning and preparation before and during the hike. The gear needs to be reduced to what is essential. Before each section the correct type and quantity of food needs to be selected.
The isolation of some parts of the trail demands a self-reliant attitude and cautious behaviour. The hiker needs to feel confident and move safely in various terrains, that reach from snow covered mountains passes to dense tempered rain forests.
Sudden weather changes may happen anytime in this mountainous region. The hiker needs to be mentally prepared and technically equipped to master in example an surprising snow storm and closing in clouds while cossing a mountain pass. Good judgment is required to avoid such situations and to take a decision to wait or return and seak shelter if the weather changes in a concerning manner. While hiking we were told several times true storries about disappeared and frozen to death people.
Good navigational skills are essential since the route is mostly unmarked. The hiker needs to recognize and follow the often only vaguely visible trails. Knowledge in setting up and using a GPS is compulsory.
This trail should only be attempted with at least some Spanish knowledge and practice. You should be able to introduce yourself, explain what you are doing and buy food and other supplies. Hardly anyone that you will meat along the trail speaks or understands even a few words in English.
The following skills are NOT required:
- Rock climbing
- White water rafting
- Any super-man-capabilites
Difficulties, Dangers and Annoyances
To be issued.
River Crossings - Together, Shoes, Hiking Poles, Rope, Don't cross if not safe / Navigation - GPS with sufficent power / Weather - Don't cross passes in bad weather / Isolation - SPOT / Hanta - Mice, Puestos / Annimals - Boar, Puma / Tabanos - Annoying but no harm
Comment to KMZ File for Trekking
The KMZ file contains the geographic information of the trail and can be opened in Google Earth and uplodaded to most current GPS devices. See the wikipedia article for further information to this file format.
The KMZ file displayed on the satellite map above is optimized to provide a good overview but does not include waypoints and detailed information for hiking. Therefore the KMZ file below should be downloaded and used if you actually plan to hike a section or the entire Greater Patagonian Trail.
Greater Patagonian Trail with waypoints, options and alternatives: KMZ file (Update from 2014-Jul-26)
The file is organized in folders and subfolders for a better overview in particular when viewing and organizing the trail on a computer. There is one folder for each section and each section contains a subfolder for waypoints and a subfolder for tracks.
Waypoints
The waypoints are named with the item of interest at the waypoint. A alphanumeric code is added in brackets to be able to refer in the trail description to specific waypoints. The GPS normally displays the entire waypoint name with the code.
Example waypoint name: Start (GPT01-WP001)
- Start: Item of interest, in this case the start of section 1
- (GPT01-WP001): Alphanumeric code in brackets
- GPT: Greater Patagonian Trail
- 01: Section 1
- -WP: Waypoint
- 001: Running number
| Item | Comment |
|---|---|
| Border | Point where the trail crosses the actual border between Chile and Argentina. The border control is typically in a different location. |
| Border Control | Location where the police performs the exit and entry control. If you plan to cross the border you need to actively seek the police at the border control. You will not be given an entry step without getting the exit stamp first. |
| Bridge | Pedestrian or vehicle bridge. May be in poor state. |
| Bus Stop | Marked or unmarked bus stop. In most places buses will stop at any location if you clearly signal the driver that want to take a ride. Ask locals for the bus frequency and times. |
| Cable Car River Crossing | At larger rivers that cannot be crossed by food cable cars are ocasionally installed. Ask the locals how to operate them to cross the river. Click here to see an image. |
| Camp | Location suitable for camping. If not stated otherwise water and fire wood is available nearby. |
| Carabineros | Chilean local police. To control the border small partly improvised police posts are setup and manned during the summer in remote areas. Whenever you reach such a police post report to them and explain your plans. We were always treated very nicely. |
| CONAF | Corporación Nacional Forestal. Conaf is the governing body of all National parks of Chile, including those without forest or major vegetation. |
| Diversion | Location where the trails splits or where attention is needed to no miss the correct trail. |
| Ferry | Public ferry. |
| Food | Location where you may get food or a meal. |
| Gate | Gate that may be locked. We several times climbed over such gates. |
| Hot Spring | Natural geothermal hot spring. |
| Hotel | There are not many hotels along the trail so if you get there it's rare opportunity to pamper yourself. |
| Lake | Fresh water lake. |
| Lodging | Accommodation of any type that is not a hotel. May be a simple room in a private house with a family (hospedaje familiar) or a bungalow (cabaña). |
| Mini Shop | Small shop or kiosk with a limited product range. If closed ask at the houses nearby for attention. |
| Pass | Mountain pass. The pass elevation is normally added. |
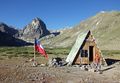
| Puesto | Improvised shelter or house in a remote area that is temporary used during the summer. If locked do not enter except in emergencies. If open you may use the shelter if needed with the appropriate respect. |
| Refuge | Shelter that is open for public use. |
| Restaurant | Restaurant but not expect a sophisticated cuisine but a meal that fills. |
| River Crossing | River crossing without a bridge or a cable car. Water levels may change significant with snow melt, rain and daytime. If the river is feed by snowmelt water levels are normally lowest in the morning. Since rivers can change their bed look for the optimal spot where to cross and do not rely on the waypoint but your own judgment. River crossings are also location where you can get drinking water. |
| Sea | Access to the sea. |
| Settlement | Group of permanently inhabited houses. |
| Settler | Single permanently inhabited house. |
| Shop | Shop with a wider product range. If closed ask at the houses nearby for attention. |
| Start | Starting point of a section. |
| Summit | Summit of a volcano along the trial that can be climbed on an optional side trip. |
| Trail Head | Location where a trail starts on a road. Attention is needed to no miss this trail. |
| w/o Water | Camp or Puesto without drinking water nearby. If you plan to camp at such a location you should carry sufficient water for one night. |
| w/o Wood | Camp or Puesto without fire wood nearby. If you plan to camp at such a location you should either carry a camping stove or sufficient fire wood for one night. |
| Water | Location where you can get drinking water. The water may need to be filtered, boiled or chemically treated to be fit for drinking. |
| $ | Camp or Hot Spring where you need to pay. |
| ? | Not verified waypoint. The unconfirmed waypoints are based on satellite images, maps or tales from locals. Whenever you can confirm or correct such a waypoint, you are welcome to send the waypoint with a comment to the author of this trail for update of the GPS File. |
Tracks
The track of each section is broken into smaller segments to differentiate between different trail types and to incorporate options and alternatives. Each section consists of up to 20 trail segments. Each track is name with a unique alphanumeric code.
Example track name: GPT01-TR006-1
- GPT: Greater Patagonian Trail
- 01: Section 1
- -TR: Track
- 006: Running number
- -1: Trail type, in this exmaple its a hiking trail or horse trail
A -X is added to the track name of optional side trails or alternative routes.
Example track name: GPT01-TR007-0-X
The -X at the end means that this is an optional side trip or alternative route. In this example its the optional climb to the summit of the volcano Descabezado Grande.
Used trail types are:
| Trail Type | Code | Comment |
|---|---|---|
| Cross Country | 0 | Track that pases through open terrain without a visisble trail. |
| Hiking or Horse Trail | 1 | Mostly visible trail on any terrain. |
| Minor Dirt Road | 2 | No or light traffic only. Can also be an abandoned road or a private road that is not open for public use. |
| Mayor Dirt Road | 3 | Public dirt roads with transit traffic. |
| Paved Road | 4 | Only few shorter segments at the start or finish of a sections. |
| Lake (Packraft) | L | Alternative options available if not carrying a packraft. |
| River (Packraft) | R | Alternative options available if not carrying a packraft. |
| Sea (Packraft) | S | Alternative options available if not carrying a packraft. |
| Ferry | F | Alternative ferry over lakes if not carrying a packraft. |
| To be verfied | ? | Remains to be hiked and recorded by GPS to update the trail file. Alternative option available if not in explorers mood. |
| Options and Alternatives | X | A -X is added to the track name for optional side trips or alternatives i.e. trails around lakes. |
Distances, Ascents, Descents and Walking Times
This trail description contains plenty of numbers for distances, altitudes, ascents, descents and even walking times. All these numbers are based on the "cleaned" GPS track without our occasional seek and search detours. Also all altitudes, ascents and descents are based on a digital map with a quite precise altitude profile.
These numbers are therefore also free of accumulated "GPS noise" and "barometric altimeter noise" that increase the measured distances, ascents and descents when recording the track by GPS while hiking. So, don't be surprised if your GPS will always indicate longer distances, more ascents and decents even if you stay on the trail. A deviation of 10% is typical.
The walking times provided here are estimated moving times without any breaks and rests. When evalutating our GPS records I was surprised that we did not move nearly one third of the time between leaving the camp in the morning and stopping again in the evening. It did not appear to us that we make such long breaks but the GPS record does not lie. So a walking time of 6 hours means more or less a 9 hour hiking day adding normal breaks for eating, taking pictures, verifying the route, chating with the locals on the trail or harvesting some piñones.
The estimated walking time is calculated purely based on distances, ascents and descents. I opted to use such a calculation because it removes the unnecessary seek and search detours and the factor of having a good day or a bad day. I developed and verified this calculation method based on all our GPS records and was surprised myself that such a simplified calculation provides quite reliable estimates. The calculated times correspond closely with our actual walking time. If applied to our actual GPS records the average deviation per day is 15 minutes and never more than 50 minutes.
The used calculation factors are:
- 12:23 minutes per km (corresponds with a 4.8 km/h walking speed on a level trail)
- Additional 11:26 minutes per 100 m ascent
- Additional 3:44 minutes per 100 m descent
These factors resulted in the smallest average deviation to our actual moving time.
Trail Verifications, Additional Options and Extensions
Verifications
The KMZ File for Trekking above contains a few not verified tracks and waypoints because we did not hike all the options and alternatives. This unconfirmed tracks and waypoints are based on satellite images, maps or tales from locals and have a question mark “?” in the name. So you know on what tracks and waypoints you can rely on and where your explorer’s skills are needed. Tracks that need to be explored can also be recognized on unnatural straight lines over longer distances.
Whenever you walk such a not verified trial, you are welcome to record the trail by GPS and send the file with a comment to the author of this trail for update of the KMZ File.
Additional Options
If you know a better or simply an interesting alternative trail, that fits well into this Greater Patagonian Trail you are invited to be become co-author by sending your proposal with a GPS File to me. I will review it and incorporate it in the master file. This applies also to helpful new waypoints.
Extensions
This trail is not finished yet. There is plenty of terrain left till this trail finally reaches the southern tip of Patagonia and ends either on the shores of the Magellan street or even on Tierra del Fuego. So, if you hiked a section that extends this trail further south or that simply covers an area that is not included yet you are more than welcome to become a co-author by contributing your trail.
The trail should get you further south on a route that is worthwhile hiking. It should consist mainly of horse trails or minor dirt road with no or insignificant traffic. Walking i.e. long distances on the Careterra Austral seams not tempting to me. If I take the Careterra Austral, than I rather do it by bicycle.
The route should be passable without a machete, technical climbing or superman skills. Cross country through of an open landscape is great but I do not want to fight me tree by tree through dense tampered rainforest.
It does not matter at all if the trail is on the Argentine side or the Chilean side as long as it does not depend on clandestine border crossings. If you get catched in particular by the Chilean carabineros without a valid stamp you may get expelled and this makes not a nice finish of such a trip.
Section Descriptions
The section descriptions below provide supplementary information to all sections of the Greater Patagonian Trail and will be issued in the following months.
An experienced hiker in explorers mood with good Spanish knowledge and planning skills will probably be able to hike the entire Greater Patagonian Trail without these detailed descriptions by fully exploiting the information provided in the detailed KMZ file for trekking.
Section 1: Volcán Descabezado
- Duration: 6 to 8 days
- Distance: 103 km
- Ascent: 4970 meters ↑
- Descent: 4870 meters ↓
- Option 1: Climb to the summit of the volcano Descabezado Grande
- Duration: 1 to 2 days
- Distance: 16 km
- Ascent: 2030 meters ↑
- Descent: 2030 meters ↓
- Option 2: Explore to hidden lakes
- Duration: ½ to 1 day
Summary
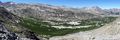
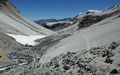
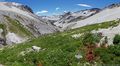
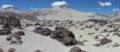
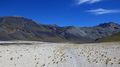
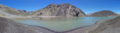
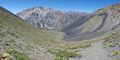
The first stage of the Greater Patagonian Trail gets you right into a mind-blowing volcanic theatre. The landscape is transformed by numerous powerful eruptions of the volcano Descabezado Grande and it’s equally potent smaller brothers in the surrounding. During the last major outbreak in 1932 the Quizapu; a parasitic crater 6 km south of the main crater; vomited an estimated 25 cubic kilometer of lava and volcanic ash.
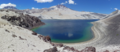
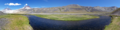
After leaving the forest you will step through endless fields of pumice, climb three passes and cross a 4 km wide lava river. The struggle is rewarded with amazing outlooks, deep blue lakes and lagoons that suddenly pop in a surreal scenery and two thermal springs. Here you can soak up heat during a freezing night while admiring a sky full of stars. You can even cook your meal on one of the hot steam vents.
As an option your may climb to the 3900 m high summit of the “Great Decapitated”; this is what Descabezado Grande means. It’s a demanding long but technically uncomplicated ascent.
You can also explore two hidden lagoons; one that fills an ancient crater and a second one that was dammed up by another smaller volcano. Both lakes are not far of the trail near a scenic camp site.
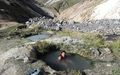
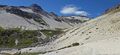
Images
Here you can see plenty of images of section 1 of the Greater Patagonian Trail that are uplodaded to Panoramio and Google Earth.
Detailed Description
And here you can read the detailed trail section description on wikiexplora: Greater Patagonian Trail Section 1: Volcán Descabezado
Image Gallery
El Bolsón
Leaving El Bolsón
Laguna Las Ánimas

Pass 2560 m
Approaching Laguna Mondaca
Laguna Mondaca

Bypasses Laguna Mondaca
Termas de Azufre
Leaving the Base Camp Descabezado Grande

Hot springs at Base Camp Descabezado Grande


Camp near Laguna Los Hornitos

Laguna Los Hornitos
Laguna Los Hornitos


